How to write
1. How to write data to a vector database
We use news data as an example to demonstrate how to write news data into the vector database and perform ANN Search. You can download the pre-prepared dataset from ipfs.
About Dataset
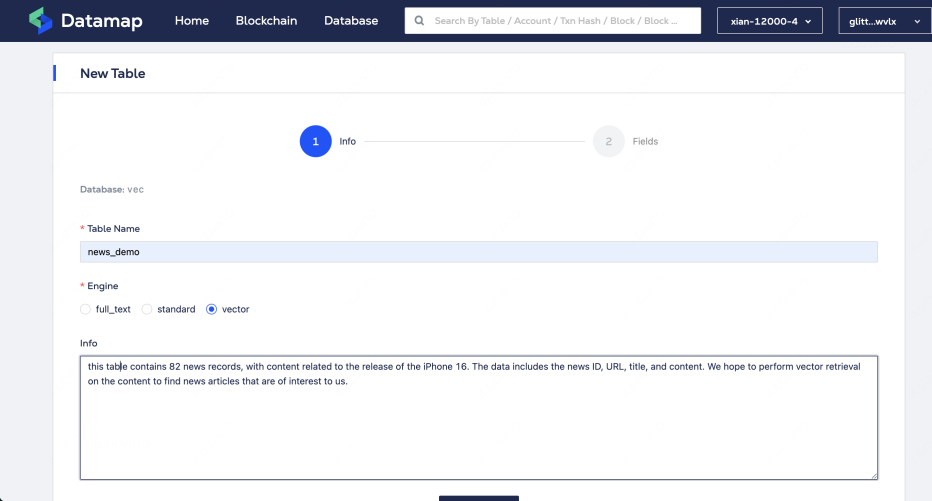
This dataset contains 82 news records, with content related to the release of the iPhone 16. The data includes the news ID, URL, title, and content. We hope to perform vector retrieval on the content to find news articles that are of interest to us.
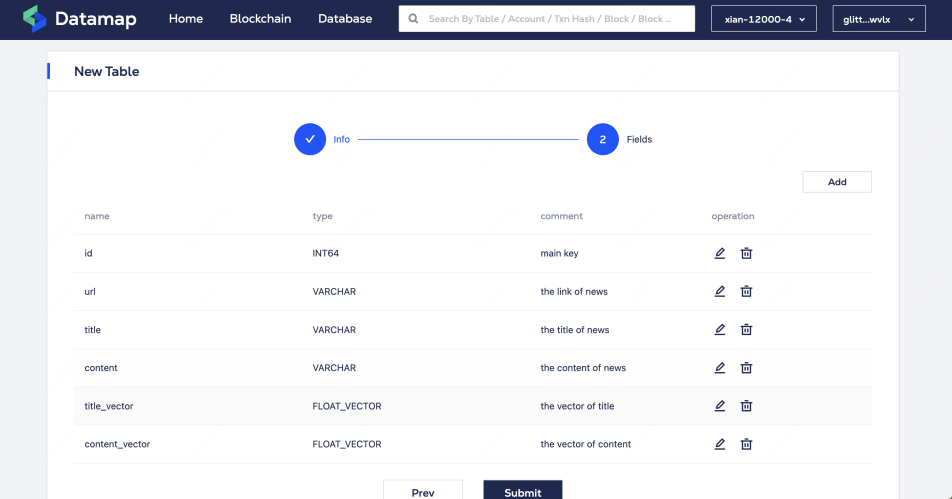
| Field | Data Type | |
|---|---|---|
| id | BIGINT | 1853351417715849015 |
| url | STRING | https://www.macrumors.com/2024/09/11/iphone-17-pro-rumor-recap/ |
| title | STRING | Skipping the iPhone 16 Pro? Here's What's Rumored for iPhone 17 Pro |
| content | STRING | Will you be skipping the iPhone 16 Pro and waiting another year to upgrade? If so, we already have |
| some iPhone 17 Pro rumors for you... | ||
| vector_title | FLOAT_VECTOR | embedding the title |
| vector_content | FLOAT_VECTOR | embedding the content |
Prepare Data
Initialize the Milvus client and call create_schema() to define the table schema. Call add_field() to add fields, where title_vector and content_vector are of DataType.FLOAT_VECTOR type, which are respectively the results of embedding title and content. The embedding model needs to be selected based on different application scenarios. Meanwhile, the setting of the dim parameter is related to the specific model.
Python
from pymilvus import MilvusClient, DataType
milvus_client = MilvusClient(token='')
schema = MilvusClient.create_schema(auto_id=False, enable_dynamic_field=False)
schema.add_field(field_name="id", datatype=DataType.INT64, is_primary=True)
schema.add_field(field_name="url", datatype=DataType.VARCHAR, max_length=1000)
schema.add_field(field_name="title", datatype=DataType.VARCHAR, max_length=2000)
schema.add_field(field_name="content", datatype=DataType.VARCHAR, max_length=65535)
schema.add_field(field_name="title_vector", datatype=DataType.FLOAT_VECTOR, dim=1536)  # dim取决于embeding模型的选择
schema.add_field(field_name="content_vector", datatype=DataType.FLOAT_VECTOR, dim=1536)
schema.verify()
Call add_index() to set index for fields that need to be searched. In this example, we create index on title_vector and content_vector because the dataset is small, we choose index type AUTOINDEX to let engine automatically select the index type. In production environment, the index type needs to be selected according to the characteristics of the dataset. Please refer to the documentation for more information.
Python
index_params = milvus_client.prepare_index_params()
index_params.add_index(field_name="id")
index_params.add_index(field_name="title_vector", index_type="AUTOINDEX", metric_type="L2")
index_params.add_index(field_name="content_vector", index_type="AUTOINDEX", metric_type="L2")
Call the create_collection() method to create a new data collection named news_demo.
Python
milvus_client.create_collection(collection_name="news_demo", schema=schema, index_params=index_params)
How to embeding
Choose a suitable model for vectorization. Here we use OpenAI's text-embedding-3-small model. You can choose other models like text-embedding-3-large, BAAI/bge-m3, etc. Different models have different dimensions. You can use dimensions to control the dimension of the vector returned by the model. Note that the dimension returned by the model needs to be consistent with the dimension defined in the schema. The default dimension of text-embedding-3-large is 1536.
Python
from openai import OpenAI
openai_client = OpenAI()

def get_embedding(text):
  text = text.replace("\n", " ")
  model = "text-embedding-3-small"
  return openai_client.embeddings.create(input=[text], model=model, dimensions=1536).data[0].embedding
The expected return result of get_embedding() is a 1536-dimensional vector:
Json
[
  0.07234696,
  0.24083021,
  -0.2613889,
  -0.25943092,
  -0.66101044,
  -0.42331296,
  0.38689473,
  0.051249847,
  0.15712704,
  0.08947919
  ...
  ...
]
Insert Data
Start data writing, first vectorize title and content, then call insert method to write to vector database.
Python
import requests
import io

url = 'https://ipfs.glitterprotocol.dev/ipfs/Qmdnkm5a7PDL8AjS4zV2nbjaaw2ADpr3fPuH1taRZQkH27'
s = requests.get(url).content
df = pd.read_csv(io.StringIO(s.decode('utf-8')))
# Vectorize the title and content.
df['title_vector'] = df.title.apply(lambda x: get_embedding(x))
df['content_vector'] = df.content.apply(lambda x: get_embedding(x))
# write to milvus
for index, row in df.iterrows():
    milvus_client.insert("news_demo", {
        "id": row["id"],
        "url": row["url"],
        "title": row["title"],
        "content": row["content"],
        "title_vector": row["title_vector"],
        "content_vector": row["content_vector"],
    })
2.How to use engine-server
Run an engine-server node and modify its configuration file to support vector databases. The configuration file needs to specify the Milvus node address and embedding_provider related information. The configuration file is as follows, and the following text will explain the meaning of the configuration items:
Config
[ [ database ] ]
name = "vec" # the name of dataset
engine = "milvus" # the type of engine
[database.config]
endpoint = "localhost:19530" #milvus endpoint
dail_timeout = "3s"
[[database.config.embedding_provider]]
name="text-embedding-3-small"
api_key="sk-xxxxx"
endpoint="https://api.openai.com/v1/embeddings"
timeout = "3s"
default=true
How to use embedding_provider
The engine-server integrates with embedding_provider through TEXT_TO_VEC, where the embedding_provider service returns
vectors that are compatible with Milvus indexes. You can use third-party embedding services, such as those provided by
OpenAI, or develop your own embedding_provider.
Instructions for using TEXT_TO_VEC:
TEXT_TO_VEC('AI','BAAI/bge-m3')will match the provider namedBAAI/bge-m3.TEXT_TO_VEC('AI','text-embedding-3-small')will match the provider namedtext-embedding-3-small.TEXT_TO_VEC('AI')will match the provider with default=true, which istext-embedding-3-small.
The first parameter of TEXT_TO_VEC is the text to be vectorized, and the second parameter is the embedding_provider to be called (the engine-server configuration file will specify relevant configurations).
Examples of using TEXT_TO_VEC:
SELECT id,
       url,
       title,
       VECTOR_L2_DISTANCE(
               content_vector,
               TEXT_TO_VEC('Your text string goes here')
       ) AS distance
FROM vec.news_demo
ORDER BY distance LIMIT
 2;
How to develop an embedding_provider
An embedding_provider service needs to adhere to the following protocol, which is compatible with OPENAI-Embedding:
Request body:
- model_name(string) The name of the model used for encoding. Required.
- api_key(string) The key for accessing the embedding service. Required.
- dimensions(int) The dimensions of the embedding result. Optional.
Returns:
A list of embedding objects.
An example request to the embedding_provider is as follows, which is initiated by the engine-server:
curl
curl --location --request POST 'https://your.embedding.provider/v1/embeddings' \
--header 'Authorization: Bearer $APIKEY' \
--header 'Content-Type: application/json' \
--data-raw '{
    "input": "Your text string goes here",
    "model": "text-embedding-3-small",
    "dimensions":1000
}'
The expected return is as follows:
Json
{
    "model": "text-embedding-3-small",
    "object": "list",
    "data": [
        {
            "object": "embedding",
            "index": 0,
            "embedding": [
                0.07234696,
                0.24083021,
                -0.2613889,
                -0.25943092,
                -0.66101044,
                -0.42331296,
                0.38689473,
                0.051249847,
                0.15712704,
                0.08947919
            ]
        }
    ],
    "usage": {
        "prompt_tokens": 5,
        "completion_tokens": 0,
        "total_tokens": 5
    }
}
Implement an embedding_provider that supports the BAAI/bge-m3 model, and configure it in the engine-server.
Yaml
[[database]]
  name = "vec" #
  engine = "milvus" #
[database.config]
  endpoint = "localhost:19530" #
  dail_timeout = "3s"
[[database.config.embedding_provider]]
  name="text-embedding-3-small"
  api_key="sk-xxxxx"
  endpoint="https://api.openai.com/v1/embeddings"
  timeout = "3s"
  default=true
[[database.config.embedding_provider]]
  name="BAAI/bge-m3"
  api_ke=""
  endpoint="http://127.0.0.1:5000/embeddings"
  timeout = "3s"
Using the embedding-server in queries
sql
SELECT
  id,
  url,
  title,
  VECTOR_L2_DISTANCE (
    content_vector,
    TEXT_TO_VEC ('Your text string goes here','BAAI/bge-m3')
  ) AS distance
FROM
  vec.news_demo
ORDER BY
  distance
LIMIT
  2;
3.Register dataset
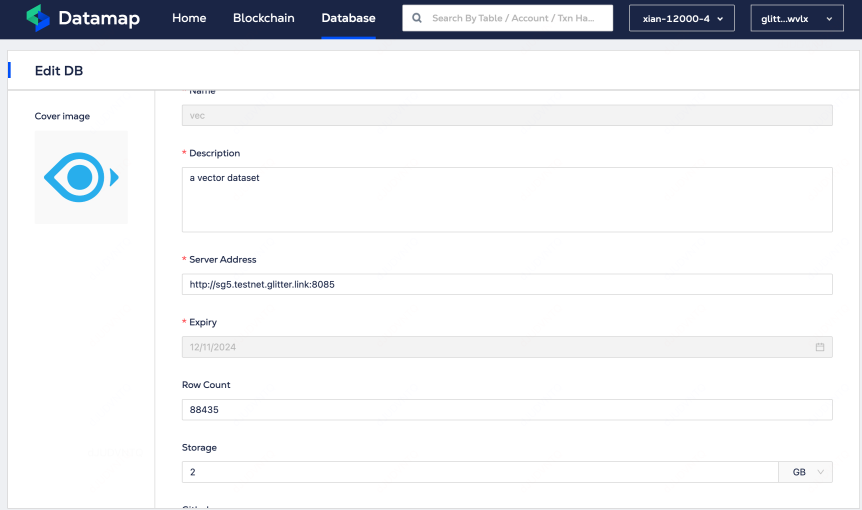
Before querying a dataset, the dataset information needs to be written to the chain so that data consumers can discover and use the dataset. The following shows how to register a dataset through go-sdk.
Register dataset, specifying the dataset name "vec" and the address of the host (engine-server).
golang
import (
  "context"
  "errors"

  "github.com/glitternetwork/glitter-sdk-go/client"
  "github.com/glitternetwork/glitter-sdk-go/key"
  chaindepindextype "github.com/glitternetwork/chain-dep/glitter_proto/glitterchain/index/types"
)

func CreateDatasetBySDK() {
  mnemonicKey := ""
  chainID := "glitter_12001-4"
  endPoint :="https://orlando-api.glitterprotocol.tech"

  pk, _ := key.DerivePrivKeyBz(mnemonicKey, key.CreateHDPath(0, 0))
  privateKey, _ := key.PrivKeyGen(pk)
  chainClient := client.New(chainID, privateKey, client.WithChainEndpoint(endPoint))

  rsp, err := chainClient.CreateDataset(
    context.Background(),
    "vec",
    chaindepindextype.ServiceStatus(chaindepindextype.ServiceStatus_value["Service_Status_Start"]),
    "http://sg5.testnet.glitter.link:8085",
    "",
    "",
    "{\"description\":\"a vector dataset\",\"cover_img\":\"https://ipfs.glitterprotocol.dev/ipfs/QmdUs8w7KTgGojHmuHkzfj67yZsvuWdzcfWgsJ1TnX2LXR\"}",
    30*86400,
  )
}
The dataset can also be registered through our developer platform DataMap:


